
This post contains affiliate links. If you buy through them, DumbSwitches may earn a commission at no extra cost to you. See our full disclosure.
No. Google Nest does not support Apple HomeKit. They are products from competing companies – Google and Apple – and neither has any interest in making their ecosystems play nicely with each other.

That said, there are a couple of legitimate paths to get some Nest devices into Apple Home. Whether those paths are worth the effort depends on which device you have and how much fiddling you are willing to tolerate.
Worth knowing up front: whatever you set up in Apple Home runs alongside your existing Nest app, not instead of it. Google’s own cloud recording service – rebranded from Nest Aware to Google Home Premium in late 2025 – still handles video history and alerts through the Nest/Google Home app. None of the paths below replace that subscription; they just get a version of the device into Apple’s ecosystem too.
Google Nest and Matter
Matter is an open smart home standard backed by Apple, Google, Amazon, and others. Devices that support Matter can be added directly to the Apple Home app – no Homebridge, no workarounds.
Here is where Google Nest actually stands on Matter in 2026:
- Nest Thermostat (2020) – received Matter support via firmware update in 2023. Can be added to Apple Home directly.
- Nest Learning Thermostat (4th gen, 2024) – Matter-certified out of the box. Works with Apple Home natively.
- Nest Thermostat E – no Matter support. Dead end without Homebridge.
- Older Nest Learning Thermostats (1st-3rd gen) – no Matter support.
- Nest Cameras and Doorbells – no Matter support at all. The camera lineup is completely locked out of HomeKit via this route.
If you have the 2020 Nest Thermostat or the newer 4th gen Learning Thermostat, Matter is the cleanest path. Open the Apple Home app, tap the + button, scan the Matter QR code on the thermostat, and you are done. No third-party software required.
One catch worth setting expectations on: Matter’s thermostat support is basic. You get mode switching and temperature adjustment in the Home app – that’s about it. Humidity readouts, fan-only control, and multi-sensor averaging (the stuff Nest’s own app does well) don’t come across through Matter. If you want the deeper feature set inside Apple Home, you’re back to Homebridge, not Matter.
Homebridge for Nest Thermostat
If your thermostat does not support Matter – Thermostat E, older Learning Thermostats – or you want the full feature set Matter doesn’t carry over, Homebridge is your option. Homebridge is an open-source software bridge that runs on a local computer or Raspberry Pi and translates non-HomeKit devices into something Apple Home can see.
The plugin you want is homebridge-nest (github.com/chrisjshull/homebridge-nest). It supports all Nest Thermostat models including the Thermostat E with Heat Link. It is actively maintained as of 2026.
You will need a machine that stays on (a Raspberry Pi works fine for this) and a Google account to authenticate the plugin against the Nest API. For background on what a Homebridge setup actually involves before you commit to one, see our guide to HomeKit bridges.
Once it’s running, the plugin surfaces your thermostat as a standard HomeKit accessory – current temperature, target temperature, heat/cool/off mode, and (depending on the model) humidity. Siri commands work the same as any other HomeKit thermostat. The tradeoff for that fuller feature set versus Matter is the always-on hardware requirement and the fact that you’re depending on a third-party plugin instead of a certified integration.
Install Homebridge
Download and install Homebridge from homebridge.io. The site has guides for Windows, macOS, and Raspberry Pi.
Open the Homebridge UI and go to Plugins
Once Homebridge is running, open its web interface (usually at http://homebridge.local:8581) and click the Plugins tab.
Search for and install homebridge-nest
Type homebridge-nest in the search bar and install the plugin by chrisjshull.
Configure the plugin with your Google account
After installation, the config screen will open. Sign in with the Google account linked to your Nest devices and follow the OAuth prompts to grant access.
Restart Homebridge
Use the restart button in the top-right of the dashboard. Your Nest thermostat should now appear in the Apple Home app within a minute or two.
Homebridge for Nest Cameras
Cameras are harder. The old homebridge-nest-cam plugin (Brandawg93) is no longer maintained and does not work with current Nest cameras.
The current option is homebridge-google-nest-sdm (github.com/potmat/homebridge-google-nest-sdm), which uses Google’s official Smart Device Management API. It supports Nest Cams, Doorbells, and Displays, and includes HomeKit Secure Video support – unlike most third-party camera bridges, which top out at live view. See our full HomeKit Secure Video guide for what that actually requires on the iCloud storage side.
The catch: setting it up requires creating a Google Cloud project, enabling the SDM API, and going through a device access registration process. Google charges a one-time, non-refundable $5 fee per account for that registration – not a recurring cost, but it’s still a paywall most people don’t expect for a “free” plugin. It is not a quick install. If you are not comfortable with developer consoles, this will be frustrating.
A paid alternative that used to solve this was Starling Home Hub – a dedicated hardware bridge that handled the Google account auth and SDM API setup for you. As of September 2025, Starling stopped manufacturing and selling the hub, citing rising component and tariff costs. Existing owners still get support and security updates for now, but you can no longer buy one new. If you find a used unit, it should still work; for a fresh setup in 2026, homebridge-google-nest-sdm is the only current path for Nest cameras.
HomeKit Thermostat Alternatives
If you are buying a smart thermostat and want native HomeKit support without any bridges or workarounds, skip Nest entirely. These are the straightforward options:
- Ecobee Smart Thermostat Premium (check price on Amazon) – native HomeKit support, built-in Alexa, includes a room sensor. The top pick for Apple households. Around $249.
- Ecobee3 Lite (check price on Amazon) – same HomeKit support at a lower price ($169). No built-in Alexa, but everything else is there.
- Sensi Touch 2 (check price on Amazon) – native HomeKit, clean interface, good option if you want something simpler than Ecobee.
Note: the Honeywell Home T9 does not support HomeKit despite being a popular smart thermostat. Check HomeKit compatibility explicitly before buying anything in this category.
Which Path Fits Your Setup
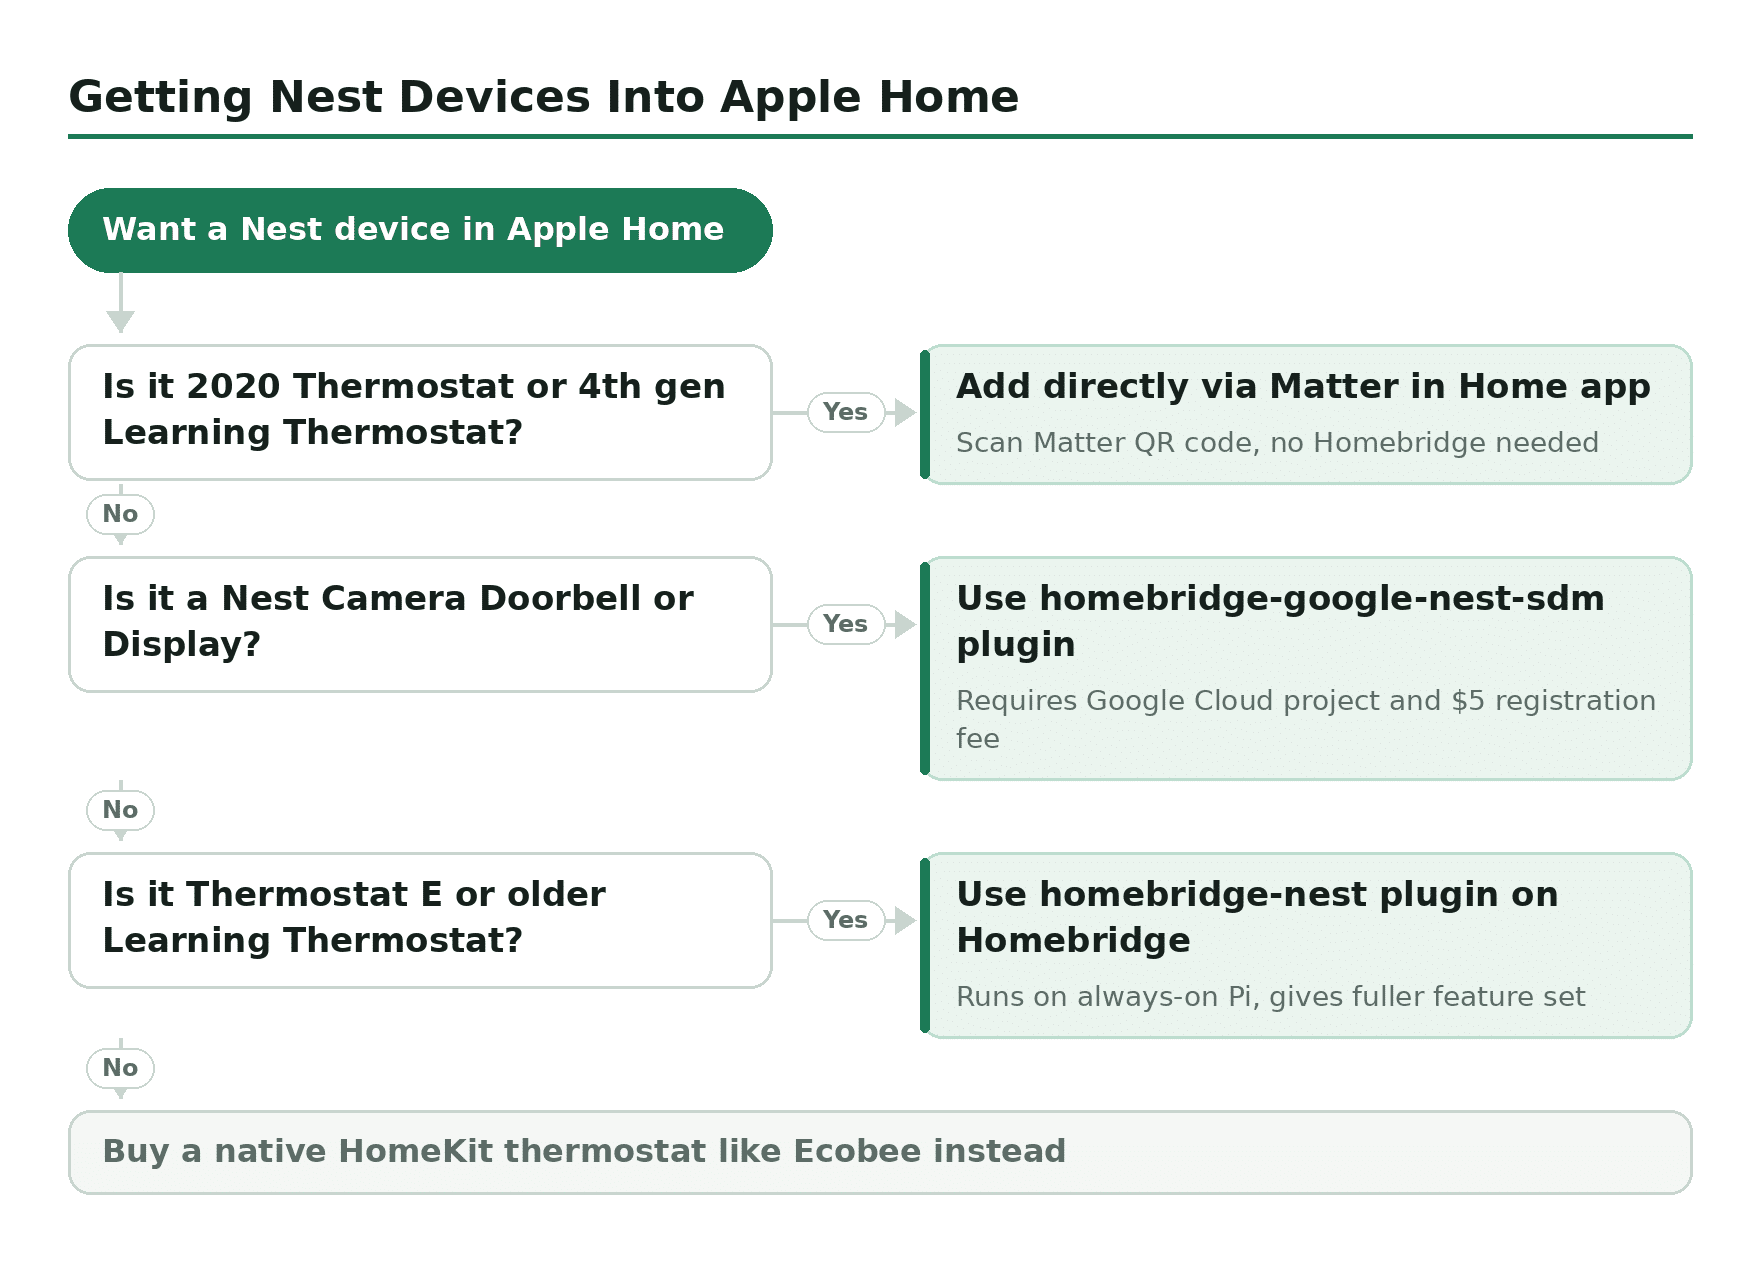
Zoomed out, the decision comes down to what you already own and how much setup effort you’re willing to spend:
| Situation | Best Path | Effort |
|---|---|---|
| Nest Thermostat (2020) or 4th gen Learning Thermostat | Matter – direct pairing in Apple Home | Low – a few minutes, no extra hardware |
| Older Nest thermostat, want full feature set | Homebridge + homebridge-nest | Moderate – needs an always-on Pi or computer |
| Nest cameras or doorbells, want HKSV | Homebridge + homebridge-google-nest-sdm | High – Google Cloud project and SDM registration |
| Don’t want to bridge anything | Buy a native HomeKit thermostat instead (Ecobee, Sensi) | Low effort, but new hardware cost |