For most Blink cameras, a sensitivity of 5 is the right starting point – that’s the default, and it’s roughly where the engineers calibrated the rest of the system to work. The Outdoor 4 ships at 6. The slider runs from 1 (low, ignores most motion) to 9 (high, fires on a moth’s eyelash). Bump it up if you’re missing real events, drop it down if your phone won’t shut up about leaves.
Last updated: May 2026. Verified against Blink’s official support docs on motion detection, sensitivity, and Smart Detection.
Quick answer by scenario
If you don’t want to read the rest, here’s what most Blink owners actually want to know.
- Driveway facing the street – sensitivity 3 to 4, plus an Activity Zone that masks out the road. Cars driving past will otherwise kill your phone’s battery faster than they kill your patience.
- Front porch / entryway – sensitivity 5 (default). This is the scenario Blink tuned the cameras for.
- Backyard with trees and shadows – sensitivity 3 to 4. Wind-blown branches at 7 or 8 will make you regret owning the camera.
- Indoor, watching for break-ins only – sensitivity 6 to 7. Things shouldn’t be moving in your living room when you’re not home.
- Indoor with a pet – sensitivity 2 to 3, and put an Activity Zone on the floor where the dog or cat lives. Or just accept you’ll have 400 clips of your cat per week.
- Outdoor 4 in a busy area – drop from the default 6 down to 4 or 5, and lean on person/vehicle Smart Detection (subscription-gated) to filter the noise rather than just the slider.
What the sensitivity slider actually controls
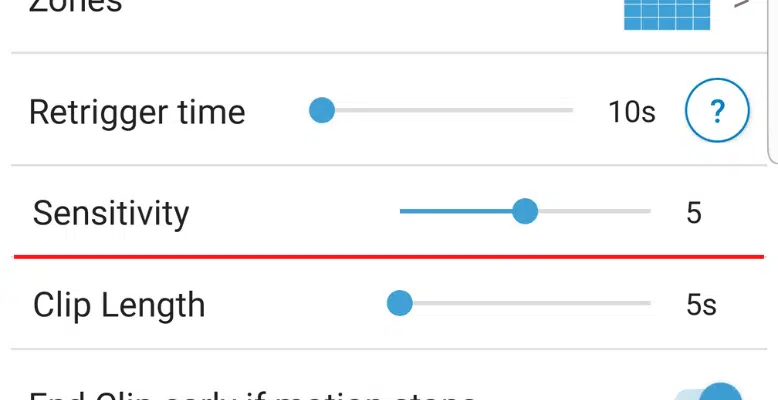
The slider is a 1-to-9 dial inside the Blink app. Blink describes it like this: at low values (1-4), more movement over a longer span of time has to happen before the camera triggers. At high values (6-9), less motion over a shorter window is enough. 5 is the middle, and it’s the default for every model except the Outdoor 4, which defaults to 6 because its sensor is newer and a bit more selective out of the box.
What the slider doesn’t do: it doesn’t change the detection range, it doesn’t change how the camera distinguishes a person from a leaf, and it doesn’t extend battery life on its own. Those are different settings (Activity Zones, Smart Detection, and Retrigger Time, respectively).
How to adjust sensitivity in the Blink app
Blink redid the Device Settings layout a couple of years back, so older guides that say “tap the gear icon” are wrong. Current procedure:
Open the Blink app and find the camera you want to tune.
Tap the More (…) icon on the camera’s thumbnail.
Choose Device Settings.
Tap Motion Settings.
Drag the Motion Sensitivity slider. Move two or three increments at a time, not all the way to one end. The scale is exponential in feel even though it’s linear in number.
Tap Save.
Arm the system and walk through the camera’s field of view to see if the new setting catches you. Tweak again if needed.
Blink’s own guidance is to nudge the slider in small steps. Going from 5 straight to 1 is the camera-tuning equivalent of using a sledgehammer to open a jar – you’ll get there, but you’ll regret it.
PIR vs PDA – why two Blink cameras with the same setting behave differently
This is the part most articles skip and it’s why your indoor Mini and your outdoor camera don’t feel like they’re running the same software, even at the same number on the slider.
The battery-powered outdoor cameras – Blink Outdoor 4, Wired Floodlight, the 3rd Gen Indoor/Outdoor, Indoor 1st Gen, XT2, and XT – use a Passive Infrared (PIR) sensor. PIR watches for heat moving across the field of view. A warm body walking left-to-right will set it off readily; a warm body walking straight at the camera barely registers until it’s close. Cold weather makes PIR less sensitive overall; hot summer days make it twitchier (everything is warm, so changes in heat look bigger).
The wired indoor cameras – Blink Mini 2 and Blink Mini 2K+ – use Pixel Difference Analysis (PDA). PDA compares every video frame to the next and triggers when enough pixels change. It doesn’t care about heat at all, which is why it’ll fire on a flickering TV screen but ignore your hand passing in front of a perfectly still wall.
Practical upshot: if you’ve got both a PIR and a PDA camera and you’re trying to make them “feel the same,” you’ll fail. Tune them separately. PIR cameras usually need a slightly higher number than PDA cameras to catch the same event.
Activity Zones – the setting that fixes more than the slider does
Blink’s official advice, buried in their support docs, is that if the lowest sensitivity setting still gives you junk notifications, you don’t need a lower slider – you need an Activity Zone. This is true for almost every problem people blame on sensitivity.
Activity Zones let you grey out parts of the camera’s frame. The camera still records the whole picture – it just stops triggering motion alerts when something moves in the masked area. Use it to mask:
- The street, the sidewalk, your neighbor’s yard
- Tree branches that move in the wind
- The sky (clouds and birds will absolutely trigger PIR)
- A bird feeder, if you want one nearby but not narrated by 60 daily clips
If you’re set to sensitivity 5 and still getting bombarded, fix the zone before you touch the slider. Drop the sensitivity once the geometry is right.
Retrigger Time – the other knob nobody touches
Retrigger Time is how long the camera waits after a clip ends before it’ll record another one. The default is 30 seconds. You can set it anywhere from 10 to 60 seconds in Device Settings, right above (or below, depending on app version) the sensitivity slider.
Short retrigger (10-15 seconds) gives you more clips but eats battery and storage. Long retrigger (45-60 seconds) saves battery but means you might miss the second half of an actual event – the package thief comes back for a second package, your camera shrugs, you see nothing. For most setups, 30 seconds is fine. Drop it to 15 if you’re using the camera as a real security tool; leave it at 30 or stretch it to 45 if you’re using it as a “did anyone come to the door” log.
Smart Detection – person and vehicle filtering (subscription required)
Since 2024, Blink has rolled out computer-vision Smart Detection on its newer cameras. Instead of (or in addition to) tuning the sensitivity slider, the camera filters its own clips and tags them as “Person” or “Vehicle.” You can then choose to be notified only when a person is detected, only when a vehicle is, or both.
Compatible cameras as of 2026: Blink Mini 2, Blink Mini 2K+, Outdoor 4, Wired Floodlight, and the second-gen Video Doorbell. Older models (Outdoor 3rd Gen, XT2, the original Mini) don’t get it – the hardware can’t run the model.
Smart Detection requires an active Blink Subscription Plan (Basic, Basic AI, Plus, or Plus AI). It’s $3/month per camera on Basic, or $10/month for unlimited cameras at one location on Plus. The AI tiers (Basic AI and Plus AI) add the newer “video descriptions” feature, which writes a one-sentence summary of each clip. Useful if you’ve got 200 clips a day and don’t want to scrub through them; not the reason to buy a camera if you don’t already have one.
If you have a compatible camera and a noisy setup, Smart Detection is honestly more useful than fiddling with the sensitivity number. Leave the slider at 5 and let the AI decide what’s a real event.
How far does a Blink camera actually see motion?
Blink’s spec is that the cameras perform best between 7 and 19 feet (about 2 to 6 metres) from the subject, and can respond out to roughly 30 feet (10 metres) in good conditions. Cranking the sensitivity slider doesn’t extend that range much – what it does is lower the threshold for what counts as “motion” inside that range. If your subject is 40 feet away, no slider setting will reliably trigger the camera; that’s a placement problem, not a settings problem.
Sensitivity is downstream of battery health
One thing the official docs don’t quite spell out: a battery-powered Blink camera with weak batteries will start under-triggering even if your sensitivity is fine. The camera is throttling itself to survive. Before you blame the slider for missed events on an outdoor camera, check battery status in the app. If it’s at “OK” or worse, swap them.
And use lithium AAs, not alkaline. Blink officially recommends Energizer Ultimate Lithium in the AA size. They last roughly three to four times longer than alkalines in these cameras and they don’t collapse in cold weather. Buying the cheap rechargeables to save eight dollars on a camera that lives on the corner of your house is the kind of decision you’ll regret in February.
My Blink camera is too sensitive – what to actually change first
In order, top to bottom:
- Set up an Activity Zone that masks the noisy area (road, trees, sky).
- If you’ve got a compatible camera and a subscription, enable Smart Detection and notify only on Person.
- Bump Retrigger Time up to 45 or 60 seconds so single events don’t generate a cluster of clips.
- Drop sensitivity two notches (from 5 to 3, or from 6 to 4) – but only after the zone is in place.
- Re-aim the camera. Bad placement causes more false alerts than bad settings.
If you’ve done all five and it’s still chaos, the camera is probably mounted somewhere it can see a heat source it shouldn’t (a south-facing wall in summer, a heat vent inside, direct sunlight). Move it.
My Blink camera isn’t sensitive enough – missed events
Less common, but here’s the order:
- Check battery level. A weak camera under-triggers before it dies.
- Confirm the subject is within the 7-to-19-foot sweet spot. PIR especially hates distance and head-on approaches.
- Re-angle so the subject crosses the field of view sideways rather than walking straight at the lens.
- Then, raise sensitivity by 2 notches. Not all the way to 9 – just up two.
Related guides
- The best Blink camera settings, end to end – everything beyond just sensitivity.
- What the red light on a Blink camera means – flash-pattern decoder for every model.
- Blink Outdoor camera review – if you’re still deciding which model to buy.