The Blink app gives you about a dozen camera settings worth touching, and the defaults are conservative on purpose – they prioritize battery life over usefulness. If you want fewer false alerts, sharper clips, and actually-useful AI notifications, change these settings in this order: motion sensitivity, Activity Zones, retrigger time, clip length, end clip early, IR intensity, and video quality. Everything else is fine on default.
The settings that matter, ranked
Here is every setting you will find in the current Blink app, what it actually does, and whether it is worth your time. I have separated the per-camera settings from the system-wide ones because people mix these up constantly.
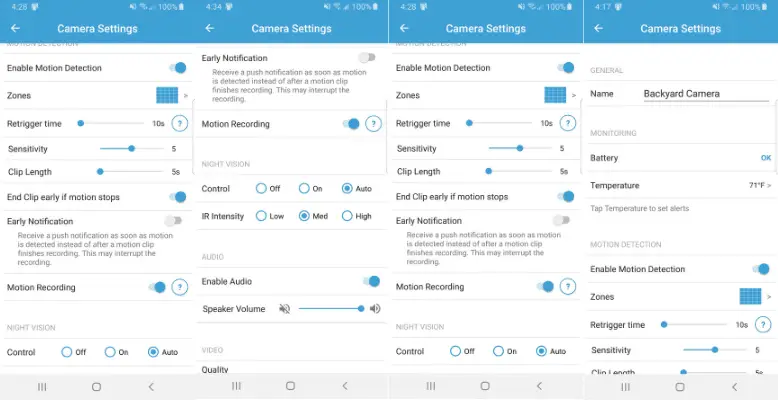
- Motion sensitivity (1-9, default 5) – Single biggest source of false alerts. Worth tuning per camera.
- Activity Zones – Mask out the parts of the frame you do not care about. Up to three rectangular zones per camera.
- Retrigger Time (10-60 sec, default 30) – How long the camera waits after one clip ends before it will record another.
- Clip Length (5-60 sec, default 5) – How long each recorded clip runs.
- End Clip Early If Motion Stops – On. Always. Saves battery without losing anything.
- IR Intensity (Low/Medium/High) – Brightness of the night-vision IR emitter. Most people want Medium.
- Video Quality – Saver, Standard, or Best. Resolutions depend on the camera.
- LED Status – Off or Recording. Off is the more secure choice on outdoor cameras.
- Motion Recording Types – All / People only / Suppressed. Subscription-gated.
- Photo Capture (snapshots) – Hourly thumbnails. Subscription-gated.
- Two-Way Audio / Speaker Volume – Drop it from max. The speaker distorts.
- Storage – Cloud or USB drive on the Sync Module 2. System-wide, not per-camera.
Motion sensitivity
Sensitivity runs on a 1-9 scale (1 = least sensitive, 9 = most). The default is 5, which is fine indoors and disastrous outdoors. If you have an Outdoor 4 facing a driveway with any trees in the frame, 5 will give you forty notifications a day about leaves.
Start at 3 for outdoor cameras with foliage or traffic in view, 5 for indoors, and 7 only if the camera is in a dead-still space where you actually want every twitch flagged. Then tune from there. This is one of the few Blink settings that genuinely needs trial and error, so I wrote a separate deep dive on Blink camera sensitivity – read that one if false alerts are your main problem.
Activity Zones
Activity Zones let you mask off parts of the frame so motion in those areas does not trigger a clip. The classic case: a backyard camera that keeps flagging the neighbor’s flag, or a driveway camera that triggers every time a car passes on the street behind it. Mask the street, keep the driveway.
You get three rectangular zones per camera. They cannot be arbitrary shapes – if you need to mask an L-shape, use two zones. Activity Zones work alongside sensitivity, not instead of it. Both matter.
Open the Blink app and tap the camera you want to configure.
Tap the settings (gear) icon in the top-right corner.
Scroll to Motion Settings and tap Motion Zones (called Activity Zones on older app versions).
Take a live snapshot if prompted – the app uses it as the masking canvas.
Drag the corner handles to draw up to three rectangles over the areas you want to ignore.
Tap Save. The masked areas will no longer trigger motion clips.
Retrigger Time and Clip Length
These two settings work together and confuse a lot of people, so here is the plain-English version:
- Clip Length is how long a single motion clip records, between 5 and 60 seconds. Default is 5 seconds. The Mini, Mini 2, and Video Doorbell cap at 30 seconds; only the Outdoor 4 and Outdoor 2K+ go to a full 60.
- Retrigger Time is the dead zone after a clip ends, between 10 and 60 seconds. Default is 30. During this window the camera will not start a new clip, even if motion keeps happening.
My defaults: clip length 15-30 seconds (long enough to see what is going on, short enough to not flatten the batteries), retrigger time 10 seconds (the minimum). The default 30-second retrigger is the reason your camera misses things – someone walks past, the camera records 5 seconds, then ignores everything for half a minute while the person breaks into your shed. Drop it to 10.
End Clip Early If Motion Stops
This is the setting that lets you have your cake and eat it. Turn on “End Clip Early If Motion Stops” and the camera will stop recording as soon as the motion ends, no matter how long your clip length is set. So you can run a 60-second clip length without burning 60 seconds of battery every time a cat walks past.
It should be on by default. Check it anyway. There is no downside.
Night vision and IR Intensity
Blink cameras have three night vision modes – Off, On, and Auto – plus an IR Intensity setting (Low, Medium, High). Leave Control on Auto. The camera will use the ambient light sensor to switch into IR when needed, and you do not have to think about it.
IR Intensity is the one to actually tune. The intuition that higher is better is wrong. High intensity blows out close-up scenes (a porch camera will get a featureless white wash three feet from the lens), and Low leaves distant scenes too dark. Use this rough rule:
- Low – Anything you are watching is within about 6 feet. Indoor cameras, tight porches.
- Medium – 6 to 15 feet. The setting most outdoor cameras want.
- High – 15+ feet, dark yards with no ambient light. Will overexpose anything nearby.
In the Blink app, tap the camera and then the gear icon.
Scroll to the Night Vision section.
Set Control to Auto.
Set IR Intensity to Medium as a starting point.
Wait until after dark, take a live view, and adjust up or down if the scene is washed out (lower) or too dark (higher).
Video quality
Blink uses three quality modes – Saver, Standard, Best – and the actual resolution behind each depends on which camera you have:
- Outdoor 3rd Gen, Indoor, XT2, Mini, Mini 2, Video Doorbell: Saver 480p, Standard 720p, Best 1080p.
- Outdoor 4, Mini 2K+, Outdoor 2K+, Wired Floodlight 2K+, Battery/Wired Doorbell 2K+: Saver 720p, Standard 1080p, Best 2K (1440p).
Set it to Best unless you are on a properly slow connection. The battery hit is real but small – a 2K+ camera will still go more than a year on lithium AAs at Best.
One thing the older guides on this site got wrong: there is no separate “Enhanced” tier on the 2K+ models. The naming stays Saver/Standard/Best across the lineup; only the resolution that each label maps to changes.
LED status
Two options: Off or Recording. Recording is the default – the blue LED lights up while the camera is capturing a clip or in live view.
For outdoor cameras, turn it Off. The blue light is a tell that the camera is active, which is useful for the visible-deterrent argument but also useful information for anyone trying to time around it. Indoors, leave it on Recording so you know when the Mini is staring at you.
Person, Vehicle, and Package detection (subscription only)
Blink’s AI detection features are paywalled behind a Blink Subscription Plan and only work on five camera models: Mini 2, Mini 2K+, Outdoor 4, Outdoor 2K+, Wired Floodlight, and the 2nd-Gen Video Doorbell. If you have an older Outdoor 3rd Gen or XT2, you do not get any of this.
As of October 2025, the plans look like this (US pricing):
- Basic – $3.99/mo or $39.99/yr, single device. Cloud storage, person and vehicle detection.
- Plus – $11.99/mo or $119.99/yr, unlimited devices at one address. Same detection features plus extended warranty.
- Basic AI / Plus AI – Adds AI-generated video descriptions (“a person picked up a package from your porch”) and package detection on top of the corresponding non-AI tier.
Once you have a plan, the Motion Recording Types setting becomes useful – you can tell the camera to record All motion, People only, or Suppress everything. Set the front-yard camera to People only and you stop getting clips of every passing squirrel. For the full breakdown of what each tier costs and which features land where, see my guide on whether you need a Blink subscription.
Make sure you have an active Blink subscription and a supported camera (Mini 2, Mini 2K+, Outdoor 4, Outdoor 2K+, Wired Floodlight, or Video Doorbell 2nd Gen).
In the Blink app, open the camera and tap the gear icon.
Tap Motion Recording Types under Motion Settings.
Choose People only to record only clips with a detected person, or All to record everything but tag person/vehicle events.
Save. New clips will show a person or vehicle tag in the event list when the camera detects one.
Snapshots and Auto-Update Thumbnail
Photo Capture (called Snapshots in older versions of the app) takes a still image once an hour and saves it to your event feed. It is useful for noticing slow changes – a car that has been in your driveway too long, a porch package that has been sitting there since Tuesday – that motion detection would never flag.
Both Photo Capture and the related Auto-Update Thumbnail setting require a Blink Subscription. If you do not have one, the option will appear greyed out.
Two-way audio and speaker volume
Every current Blink camera does two-way audio. The microphone is fine. The speaker is small and distorts at maximum volume – if you crank it to 100% you sound like you are talking through a soda can. Set Speaker Volume to about 70-80% for most installs. For more on what you can and cannot do with the audio, see Blink camera audio settings.
You can also turn Audio Recording off entirely from this menu. Worth knowing if you live somewhere with strict two-party-consent recording laws (some US states, most of the EU), or if you simply do not want to record audio in your own home.
Storage: cloud or local
This one is system-wide, not per-camera. Open the Sync Module’s settings (not a camera’s settings) and you get a choice between cloud storage (requires subscription) and local storage on a USB drive plugged into the Sync Module 2 or Sync Module XR. Without a subscription, you have to use local storage or you cannot save clips at all.
If you are going local, get a small USB drive (16-64GB is plenty), format it FAT32, and plug it into the Sync Module’s USB port. The original Sync Module (no number) does not support local storage – you need the Sync Module 2 or newer. Local clips are still viewable in the Blink app, just played back off the drive instead of the cloud.
Per-camera vs system-wide settings
People get tripped up because some settings are attached to an individual camera and some are attached to the whole Blink system. Here is the split:
- Per camera: Sensitivity, Activity Zones, retrigger time, clip length, end-clip-early, IR intensity, night vision, LED status, video quality, speaker volume, motion recording types.
- System-wide: Arming/disarming the system, scheduling, storage (cloud vs USB), Sync Module Wi-Fi, notification snooze.
The arming/disarming distinction matters a lot. Disarming the system stops all cameras from recording motion – useful when you are home and do not want notifications every time someone goes to the kitchen. For the longer explanation of when to use which, see armed vs disarmed on Blink.
Best settings by camera placement
The right settings depend on what the camera is pointed at. Use these as starting points and tune from there:
Driveway / front of house
Sensitivity 3-4, Activity Zones masking off the street, retrigger 10 sec, clip length 30 sec, end-clip-early on, IR Medium, video Best, Motion Recording Types set to People only (if you have a subscription). LED off. The driveway is where Person detection earns its keep – it cuts out 90% of the squirrel and shadow alerts. A camera with built-in lighting like the Blink Outdoor 2K+ handles this scene best because Color Vision keeps it useful after dark before IR kicks in.
Front porch / doorbell
Sensitivity 5, no Activity Zones needed (the porch is small enough), retrigger 10 sec, clip length 30 sec, IR Low (the porch is close-range), video Best. If it is a Blink Video Doorbell, also set Chime Volume to taste and turn on package detection if you are on Plus AI.
Backyard
Sensitivity 3, Activity Zones masking any tree branches that hang in the frame, retrigger 10 sec, clip length 30 sec, IR Medium to High depending on yard size, video Best, LED off. The backyard is also where battery life starts to bite if you have foliage triggering false alerts, so the Blink Outdoor 4 with proper sensitivity tuning will outlast the same camera on defaults by months.
Indoor (Mini, Mini 2, Mini 2K+)
Sensitivity 5-6, no Activity Zones usually needed in a room, retrigger 10 sec, clip length 15 sec, IR Low, video Best, LED on Recording (you want to know when it is watching). Schedule it to disarm during the hours you are normally home and arm itself overnight.
One more battery note
None of the settings above matter much if you have alkaline AAs in your cameras. Blink officially recommends lithium AAs and they are not wrong – the Energizer Ultimate Lithium AAs last roughly three to four times longer than alkalines in these cameras, and they hold up in cold weather where alkalines collapse. Buying alkalines to save $4 on a camera you have to climb a ladder to re-battery is the kind of false economy that ends in regret.
Related guides
- Blink camera sensitivity – the full tuning guide for the 1-9 sensitivity scale.
- Blink Sync Module 2 (and XR) – what you need for local USB storage.
- Do Blink cameras need a subscription? – which features sit behind the paywall.
- Armed vs disarmed – the system-wide setting that overrides everything else.
- Factory reset – for when nothing is working and you want to start over.
- IR intensity deep dive – if Low/Medium/High is not specific enough.
- Blink camera audio settings – the speaker, the mic, and what to do with them.