
This post contains affiliate links. If you buy through them, DumbSwitches may earn a commission at no extra cost to you. See our full disclosure.
Chamberlain killed Apple HomeKit support for myQ. There is no current way to add a stock Chamberlain or LiftMaster opener to the Home app, and the old Home Bridge hub is discontinued. If you still want a HomeKit garage door, you have two realistic options in 2026 – replace the smart logic with a third-party controller, or buy a HomeKit-native opener and bypass myQ entirely.
The short answer
- Does myQ work with HomeKit natively? No. Never did, and the workaround route has been steadily walled off since 2022.
- Will the old myQ Home Bridge (MYQ-819LMB) still work? If you already own one, yes, for now. Chamberlain discontinued it in August 2022 and stopped selling it. Don’t pay scalper prices on eBay – it’s a dead-end product.
- What about Homebridge plugins? The main one – hjdhjd/homebridge-myq – was archived in April 2024 after Chamberlain started actively blocking unauthorized API access. It’s dead.
- Best fix right now: install a ratgdo board on your existing Security+ 2.0 opener, or rip out myQ and use a Meross MSG100 / MSG200 universal opener that’s HomeKit-native.
- Bought a new Chamberlain in late 2025 or 2026? Check the learn button. White button means Security+ 3.0, which blocks ratgdo, Tailwind, and wired Meross controllers. Your fix is a remote-pressing device like the ThirdReality Smart Garage Door Opener ($50) – it never touches the wire, so Security+ 3.0 can’t block it.
- Already run Starling Home Hub for your Nest gear? It won’t help here. Starling bridges Nest cameras, thermostats, and locks into HomeKit – it has never supported myQ or garage doors, and there’s no sign that’s changing.
What actually works right now:
| Method | Security+ 2.0 | Security+ 3.0 | How it reaches HomeKit | Cost |
|---|---|---|---|---|
| ratgdo32 | Works | Blocked | Native HomeKit firmware | ~$50 |
| Meross MSG100 / MSG200 | Works | Blocked | Native HomeKit | $40-$70 |
| ThirdReality Garage Door Opener | Works | Works | Matter, added via Apple Home | ~$50 |
| Starling Home Hub | Not applicable | Not applicable | Doesn’t cover garage doors or myQ | – |
| myQ app only | Works | Works | Not HomeKit at all | Free |
How we got here – Chamberlain vs. HomeKit, 2017 to now
Chamberlain shipped the myQ Home Bridge (model MYQ-819LMB) in 2017. It was the one and only official path from a Chamberlain or LiftMaster opener into Apple Home, and it worked fine. Then, in August 2022, Chamberlain quietly discontinued it citing low sales, telling existing owners their bridges would “continue to work for the foreseeable future” – which is corporate for “we will stop caring about you in some unspecified amount of time.”
For a year or so, the smart-home community fell back on Homebridge plugins. The popular one – hjdhjd’s homebridge-myq – used the same private API that Chamberlain’s own app uses. In November 2023, Chamberlain published a statement labeling third-party access “unauthorized” and started actively blocking it. By April 2024 the plugin’s maintainer archived the GitHub repo. The Homebridge route is now officially closed.
Then in December 2025 came the kill shot. Chamberlain rolled out Security+ 3.0 on its newest openers. Where the older Security+ 2.0 used a simple wired interface that any third party could tap into, Security+ 3.0 moves the wall-button communication to encrypted Bluetooth Low Energy. The wires now only carry power. That single change broke ratgdo, Tailwind, and Meross’s wired controller all at once – on new openers only. Older Security+ 2.0 openers (yellow learn button on the back) are still fair game.
The summary – if you want HomeKit on a garage door, Chamberlain is now the worst possible brand to start with. If you already own one, your options depend entirely on which generation it is.
Which Chamberlain do you have? Check the learn button
Open the garage and look at the back of the motor unit. There’s a small colored button labeled “LEARN.”
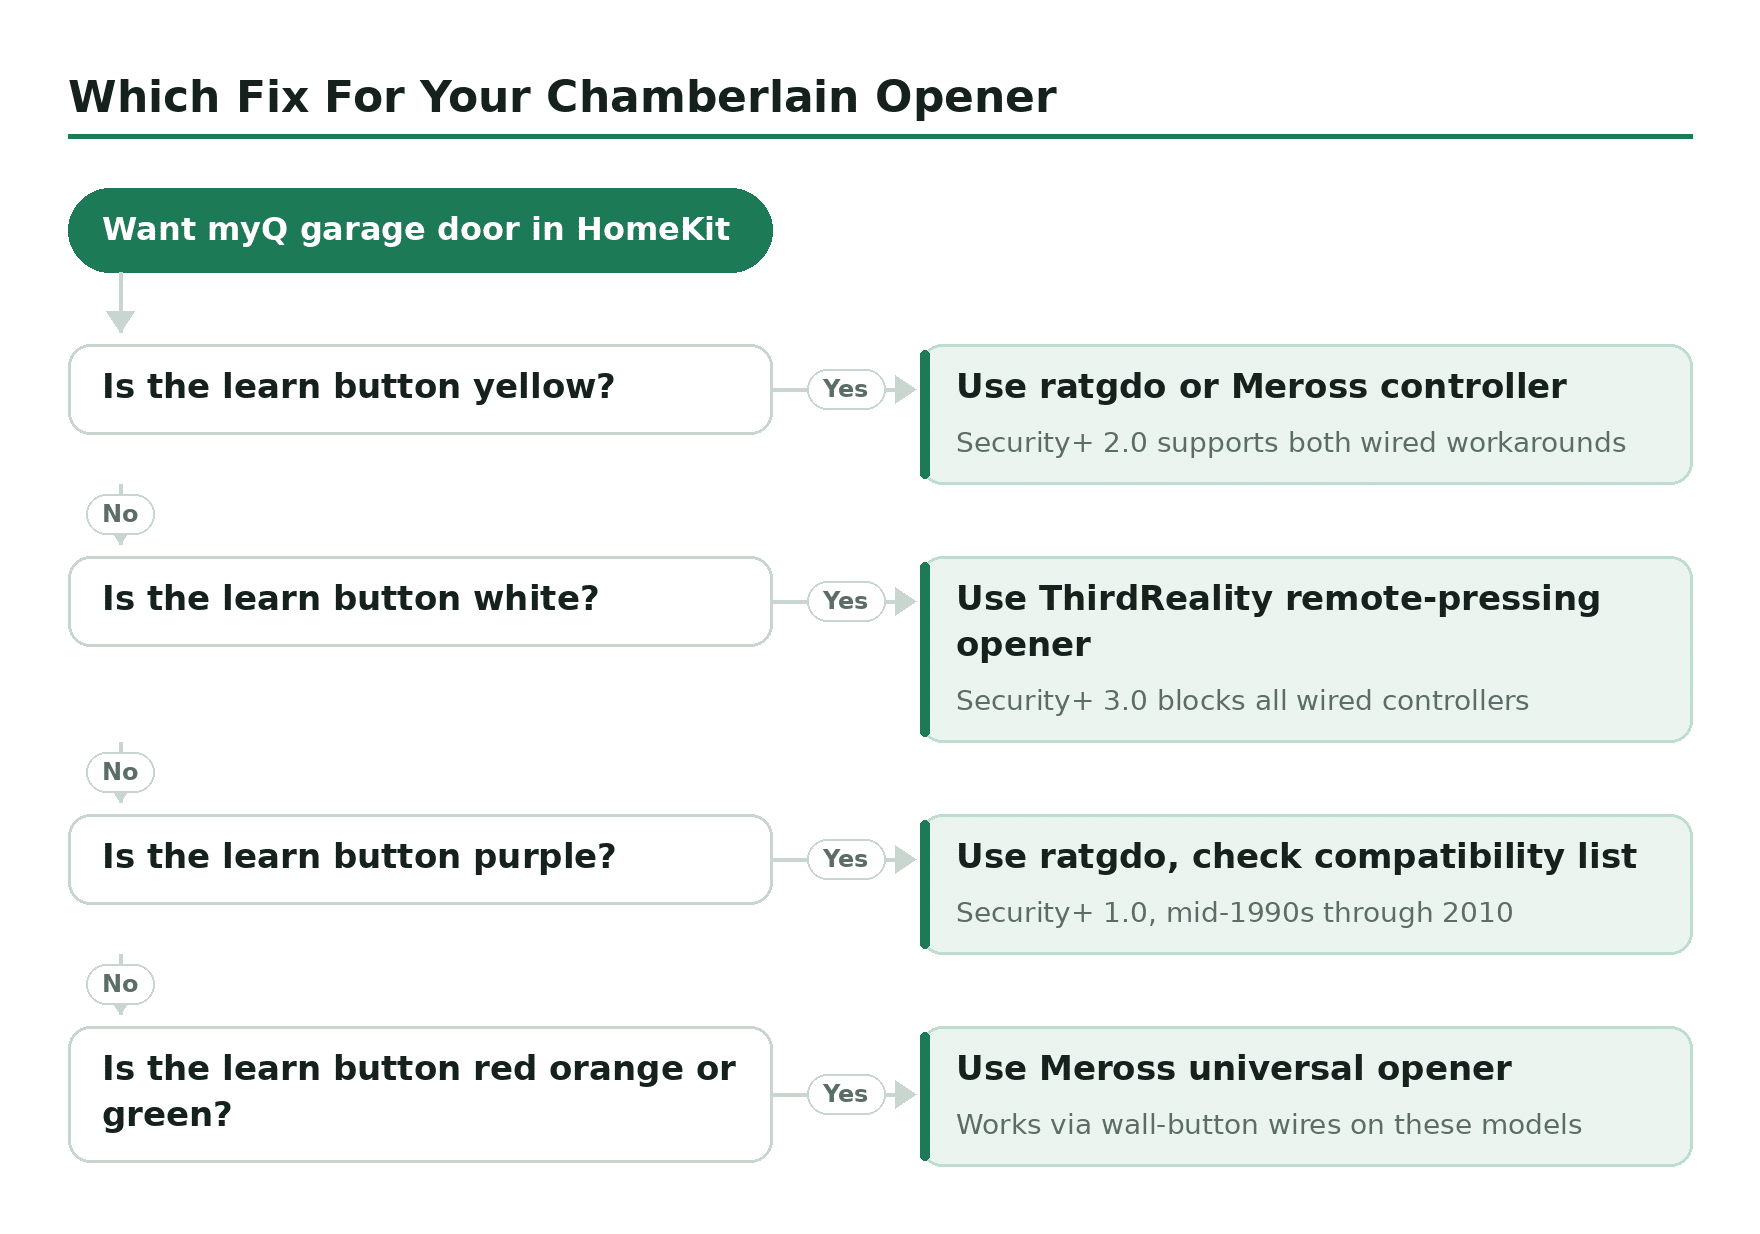
- Yellow button – Security+ 2.0. Made roughly 2011 to late 2025. ratgdo and Meross will both work. This is the easy path.
- White button – Security+ 3.0. New openers from late 2025 onward. ratgdo, Tailwind, and Meross are all blocked on the wall-button wires. Your realistic paths are (a) a remote-pressing device like ThirdReality that never touches the wire at all, or (b) replacing the entire opener.
- Purple button – Security+ 1.0, mid-1990s through 2010 or so. Very old. ratgdo supports it but check the compatibility list first.
- Red, orange, or green button – pre-rolling-code or competing brands. Most universal HomeKit openers (Meross included) work fine on these via the wall-button wires.
Option 1 – ratgdo (the right answer for Security+ 2.0)
ratgdo is a tiny ESP-based circuit board, designed by Paul Wieland, that wires directly into the back of a Security+ 2.0 Chamberlain or LiftMaster opener. It pretends to be a wall button and talks to the motor on its own protocol, which means it does not touch the myQ API at all. Chamberlain can’t block what it can’t see.
The relevant detail for this article – ratgdo ships with a native HomeKit firmware (homekit-ratgdo), so once the board is wired up you scan a HomeKit setup code in the Home app and you’re done. No Homebridge, no Home Assistant, no extra server. The door state (open, closing, closed, opening), obstruction sensor, opener light, and motion sensor on newer Chamberlain motors all flow into Home as proper accessories.
The current hardware is ratgdo32 disco, sold direct from ratcloud.llc for around $50. Five minutes of soldering-free wiring (it uses the same terminals as the wall button), flash the HomeKit firmware over Wi-Fi if it didn’t ship with it, scan the code, done.
Add a Security+ 2.0 Chamberlain or LiftMaster opener to Apple Home using ratgdo with native HomeKit firmware.
Confirm your opener has a yellow learn button (Security+ 2.0). White means Security+ 3.0 – stop, ratgdo will not work.
Order a ratgdo32 disco board from ratcloud.llc. Make sure you select the HomeKit-ready bundle (it ships with homekit-ratgdo firmware).
Unplug the garage door opener at the wall outlet before wiring anything.
On the back of the motor, you will see the two existing wall-button terminals and (on newer models) two more for the obstruction sensors. Connect the ratgdo terminals to the same pairs – the board includes a pigtail and instructions.
Plug the ratgdo into a USB power source. The motor opener stays unplugged for now.
On your phone, join the ratgdo Wi-Fi network it broadcasts (looks like ratgdo-xxxxxx) and enter your home Wi-Fi credentials in the captive portal.
Plug the garage opener back in. Press and hold the ratgdo learn button until the opener beeps and the LED on the back of the motor flashes – this pairs the board to the door as if it were a new remote.
Open the Apple Home app, tap Add Accessory, and either scan the HomeKit code printed on the ratgdo or enter it manually.
Assign the garage door to a room and name it. You can now ask Siri to open the garage, set up automations, and use the Home widget on your lock screen.
One caveat worth knowing – in 2024 the original native homekit-ratgdo developer stepped back from the project. The firmware still works and is still on GitHub (ratgdo/homekit-ratgdo), but expect slower bug fixes than the Homebridge or Home Assistant routes. If you want maximum hand-holding, you can also use ratgdo hardware with Homebridge via the homebridge-ratgdo plugin, which is more actively maintained – same hardware, same HomeKit result, slightly more setup.
Option 2 – replace the smart part with a Meross opener
If soldering nothing is still too much soldering, the cleanest answer is to leave your Chamberlain motor in place and bolt a HomeKit-native universal opener on top of it. The Meross MSG100 is the workhorse here – around $40, single-door, works with virtually any opener that has wall-button terminals (including Security+ 2.0 Chamberlain models), and supports HomeKit, Siri, CarPlay, Alexa, Google, and SmartThings out of the box. No hub, no subscription. If you have two or three doors, the Meross MSG200 handles up to three from one controller for around $70.
Setup is genuinely easy. You wire the Meross to the wall-button screw terminals, peel-and-stick the wired tilt sensor to the top panel of the door (the wired sensor is annoying to run but more reliable than wireless), then add it through the Apple Home app via a HomeKit QR code. Total time, including running the sensor wire across the ceiling, is about 30 minutes if you’re slow.
One important caveat – the Meross controller only works on Security+ 2.0 and older openers, the same as ratgdo. Chamberlain’s Security+ 3.0 protocol broke this approach in late 2025. If you bought a Chamberlain in the last six months and it has a white learn button, Meross won’t work either.
Option 3 – if you have a Security+ 3.0 opener (white learn button)
This used to be the brutal one. If your Chamberlain is new enough to have a white learn button, Chamberlain has deliberately closed off every wired workaround – ratgdo doesn’t see the door state, Meross can’t trigger the door, Tailwind is in the same boat. As of September 2026, no third-party controller reads the encrypted Security+ 3.0 signal directly. But a workaround that skips the wire entirely showed up in late 2025, and it changes the answer.
The ThirdReality Smart Garage Door Opener ($50, launched November 2025) doesn’t try to talk to your opener’s protocol at all. You pop a spare remote or visor clicker into the unit, and a small motor physically presses the button whenever you trigger a command – the same as walking up and pressing it yourself. Since it never touches the wire, it doesn’t care whether you’re on Security+ 1.0, 2.0, or 3.0. It’s Matter-certified, adds to Apple Home directly with no bridge or extra hub, and comes with its own tilt sensor for open/closed reporting. The catch: you need a spare remote to sacrifice into the unit, and it’s a new product without ratgdo’s multi-year track record.
If ThirdReality isn’t the right fit, your other options are:
- Use myQ’s own ecosystem and skip HomeKit entirely. The myQ app works fine; it just doesn’t talk to Apple Home. You can still get notifications and remote open/close – you just need a second app on your phone.
- Replace the entire opener motor with one that’s HomeKit-native via Matter or a non-Chamberlain brand. This is a $250 to $400 swap with installation, but it’s a true fix, not a workaround. Genie’s newer Aladdin Connect models are HomeKit-capable via Aladdin’s own bridge, though that bridge has had reliability complaints since the brand changed hands.
- Wait for Matter’s own garage door spec. Matter still doesn’t have a dedicated garage door device type – it’s why ThirdReality’s board pretends to be a Matter light switch instead of speaking a real garage protocol. A native spec is on the working group’s roadmap with no committed date, so don’t plan around it.
If you’re shopping for a brand-new opener today and HomeKit matters, just don’t buy Chamberlain or LiftMaster. The company has made its position on third-party integration extremely clear, three times in a row now. There’s no reason to expect that to soften – budget for a remote-pressing workaround if you’re stuck with one already.
Why bother with HomeKit instead of the myQ app?
For anyone reading this who isn’t already neck-deep in HomeKit, the question is fair. Why fight Chamberlain at all when the myQ app already opens the door from anywhere?
- One app instead of fifteen. Your garage shows up next to your lights, thermostat, locks, and cameras.
- Real automations. “When the front door locks at night, close the garage if it’s still open.” HomeKit can do that. myQ alone can’t.
- Siri and CarPlay. Pulling into the driveway and saying “Hey Siri, open the garage” without unlocking your phone.
- Geofencing that actually works. HomeKit uses your iPhone’s location and the home hub together, more reliable than myQ’s standalone geofence, which has been called out for false triggers and battery drain for years.
- Local control. If your internet goes out, ratgdo and Meross both still respond to HomeKit commands on your local network. The myQ app needs Chamberlain’s cloud to be up.
What about the old MYQ-819LMB Home Bridge?
If you already have one and it’s working, leave it alone – it still works, and Chamberlain has said it will keep working “for the foreseeable future” (their words, August 2022). Don’t update its firmware unless prompted, and don’t reset it casually; a few owners on the Homebridge forums have reported their bridge bricking itself after a forced reset.
What you should not do is pay $200 for one on eBay. It’s a discontinued product with no future support, the manufacturer is hostile to its own customers, and ratgdo or Meross will give you a more reliable HomeKit experience for less money. Treat the 819LMB as legacy hardware and plan your exit.
Related guides
- What is a HomeKit Bridge? – background on how non-native devices reach Apple Home.
- Can I use an iPhone as a HomeKit hub? – the cheapest way to get remote-access automations working.
- Raspberry Pi HomeKit hub setup – if you want to run Homebridge yourself.
- Home Assistant vs. Apple HomeKit – for people who outgrow the Home app.
- HomeKit garden automation – for outdoor automations beyond the garage door.