
Yes, the Ring Doorbell 2 can be hardwired – and if you have existing doorbell wiring already run to your front door, you should do it. The catch: wiring doesn’t replace the battery. It trickle-charges it continuously, which means you stop thinking about battery levels entirely. One less thing.
Worth noting upfront: Ring discontinued the Doorbell 2 in 2022. If you’re shopping today, the Ring Battery Doorbell Plus is the current equivalent. But if you already own a Doorbell 2 and want to get it hardwired, everything below still applies.
What Hardwiring Actually Does (And Doesn’t Do)
This trips people up constantly. Hardwiring the Ring Doorbell 2 does not convert it into a fully wired device. The battery stays in the device and does its job. The wiring just keeps it charged so the battery never drains down.
Contrast that with something like the Ring Video Doorbell Pro, which has no battery at all and requires hardwiring to function. The Doorbell 2 is a battery-first device with optional wired charging. Wiring is better. But battery-only works fine too.
What You Need Before Starting
Transformer Requirements
Your transformer needs to output 8-24 VAC, 50/60Hz, 5-40VA. Per Ring’s official wiring guidelines, 16VAC at 30VA is the sweet spot – it gives the doorbell enough power to charge reliably without stressing the chime. The Ring 16VAC Hardwired Transformer is a clean option if you’re replacing an old one.
One common failure point: old homes often have 8-10VA transformers. That’s technically within the voltage range but won’t provide adequate charging current. If your doorbell shows as “hardwired” in the app but the battery keeps dropping, the transformer is usually the culprit.
Wire Specs
18-22 AWG doorbell wire, max run of 100 feet. If your existing doorbell wiring falls in that range, you can use it as-is. And no, polarity doesn’t matter – the Ring Doorbell 2 isn’t polarity-sensitive, so it doesn’t matter which wire goes to which terminal.
Pro Power Kit V2
The Pro Power Kit V2 ships in the box with the Doorbell 2. If you have an existing mechanical chime, you’ll install this at the chime box. It prevents the chime from overheating under continuous power and provides bypass functionality. Don’t skip it if you’re keeping your existing chime.
If you’re using a digital chime, you’ll need to add a diode to prevent interference with the chime sound. Ring’s app walks you through chime type selection during setup.
Tools
- Flathead and Phillips screwdrivers
- Wire stripper
- Non-contact voltage tester
- Drill (for mounting, if no existing bracket)
Wiring Diagram
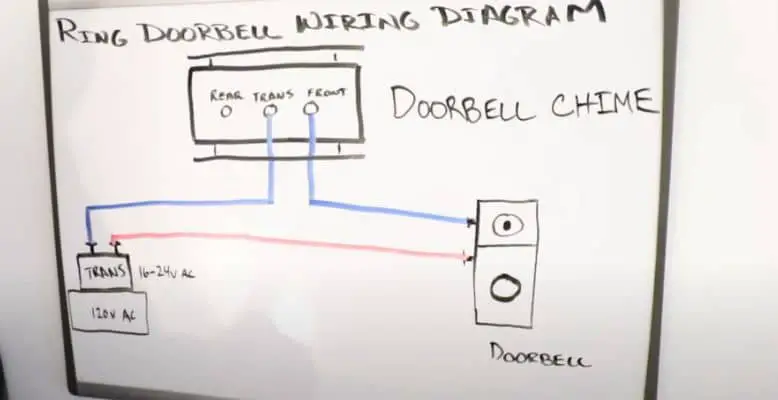
How To Hardwire The Ring Doorbell 2
Step-by-step guide to hardwiring the Ring Doorbell 2 to existing doorbell wiring.
Turn Off The Breaker
Find the breaker controlling your doorbell circuit and switch it off. Use a non-contact voltage tester to confirm the circuit is dead before touching any wires. This is the step people skip and regret.
Remove Your Old Doorbell
Unscrew the old doorbell from the wall and pull it out. You should see two low-voltage wires coming out of the wall. Note their position – though with the Ring Doorbell 2 it doesn’t matter which is which, since the device isn’t polarity-sensitive.
Install The Pro Power Kit V2 At Your Chime
Go to your indoor chime box and open it. Locate the terminals labeled Front and Trans. Disconnect those wires, then insert them into the bypass holes on the Pro Power Kit V2 until they click in place. This protects the chime from overheating under continuous power. Skip this step only if you’re using no chime at all.
Verify Or Replace The Transformer
Check that your transformer outputs 8-24 VAC. If you find an old 8VA unit, replace it – it won’t charge reliably. The Ring 16VAC transformer is a straightforward swap and is exactly what Ring recommends for this device.
Connect The Wires To The Ring Doorbell 2
Strip about half an inch of insulation from each wire end. Loosen the two terminal screws on the back of the Ring Doorbell 2 and attach one wire to each terminal. It doesn’t matter which wire goes where. Tighten the screws down so there’s no bare wire exposed.
Mount And Restore Power
Mount the Ring Doorbell 2 to the bracket on the wall, then press the faceplate in until it clicks. Go back to the breaker and restore power. The doorbell LED should light up.
Test And Configure In The App
Press the doorbell button to trigger a chime test. Then open the Ring app and navigate to Device Health – it should show the power source as ‘Hardwired.’ If it still shows ‘Battery,’ check your wire connections and transformer output.
Existing Wiring Vs. No Existing Wiring
If you already have doorbell wires running to your front door, the install is straightforward. Disconnect the old button, hook up the Ring, install the Pro Power Kit at the chime, done.
If there’s no existing wiring, you’re looking at a real electrical job – running 18-22 AWG wire from a transformer through your walls to the door location. That’s either a weekend project if you’re comfortable with it, or a $150-200 electrician visit. At that point, honestly consider whether a battery-only setup solves the problem just as well for you.
Troubleshooting
Hardwired But Battery Still Draining
The app shows “Hardwired” but the battery is still dropping. Most likely cause: your transformer is undersized. An 8-10VA transformer sits within the technical voltage spec but doesn’t push enough current to keep up with the doorbell’s power draw, especially in cold weather. Swap it for a 16-24VAC, 30VA unit.
Other things to check: loose wire connections at the terminals (finger-tight isn’t tight enough), wire run over 100 feet, or heavily corroded wire ends. Strip back to fresh copper and reconnect if in doubt.
Chime Not Working After Wiring
If your chime went silent after hardwiring, the Pro Power Kit V2 likely isn’t installed correctly – or wasn’t installed at all. Check that the wires are seated in the bypass holes and not just resting against them. Also confirm in the Ring app that the in-home chime type is set to match your actual chime (mechanical vs. digital).
Device Health Shows “Battery” Not “Hardwired”
The Ring app’s Device Health screen will tell you definitively whether the wired connection is being recognized. If it still says Battery after you’ve wired it up, go back and check both terminal connections on the doorbell itself – one loose screw is enough to break the circuit.
FAQ
Does the Ring Doorbell 2 need to be hardwired?
No. The Ring Doorbell 2 works fine on battery alone. Hardwiring is optional – it just keeps the battery continuously charged so you never have to pull the unit and plug it in. If you have existing doorbell wiring, use it. If you don’t, battery-only is a perfectly reasonable setup.
Does hardwiring the Ring Doorbell 2 replace the battery?
No. The battery stays in the device. Hardwiring provides a continuous trickle charge that keeps the battery topped up. It doesn’t convert the Ring Doorbell 2 into a fully wired device – the battery is still part of the power system.
Does the Ring Doorbell 2 need a diode?
Only if you have a digital chime. With a standard mechanical chime, no diode is needed. For digital chimes, the diode prevents interference that can cause the chime to buzz or behave erratically. Ring’s app setup process will prompt you to specify your chime type.
What transformer do I need for the Ring Doorbell 2?
8-24 VAC, 5-40VA is the full supported range, but Ring recommends 16VAC at 30VA for reliable charging. If your existing transformer is only 8-10VA, it may not provide enough charging current even if the voltage is within spec.
Is the Ring Doorbell 2 still available?
No. Ring discontinued the Doorbell 2 in 2022. The current equivalent is the Ring Battery Doorbell Plus, which has a similar form factor, upgraded 1536p HD video, and the same optional hardwiring setup.